原因
- 从2016年建立个人博客开始使用Wordpress,了解Wordpress强大的同时,也认识到Wordpress的繁琐,最烦恼的是数据库文章的问题,比如说Wordpress文章ID不连续,在使用Google Cloud Platform后数据库时不时无法连接。
- 相比于Wordpress,Hexo属于静态博客,所有源数据都放在本地,生成网站数据后发布到网上,虽然过程相对繁琐,但访问速度快,使用Github Pages后相当于无限流量。
搭建Hexo博客
1. 登录Google Cloud Platform(即GCP):Compute Engine(链接)
2. 创建实例

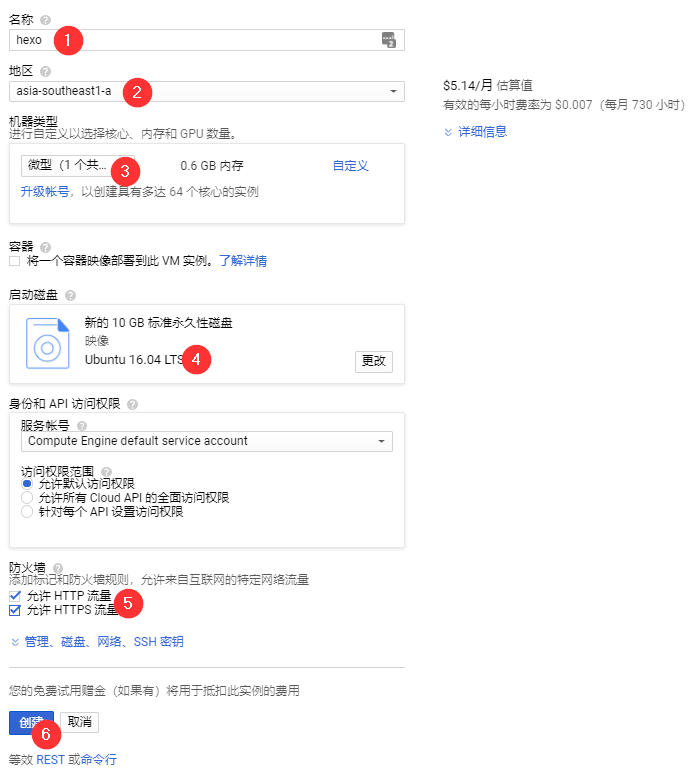
拉到最下面确认创建新实例,创建后自动启动实例:

启用实例的SSH:

使用sudo passwd设置Root密码
1
sudo passwd //设置Root密码
通过sudo su命令切换到root用户
1
sudo su //切换到root用户
修改SSH配置文件/etc/ssh/sshd_config
1
vi /etc/ssh/sshd_config //编辑文件
找到PermitRootLogin和PasswordAuthentication
1
2
3
4
LoginGraceTime 120
PermitRootLogin yes //默认为no,需要开启root用户访问改为yes
StrictModes yes
PasswordAuthentication yes //默认为no,改为yes开启密码登陆重启SSH服务使修改生效,Ubuntu同样适用
1
/etc/init.d/ssh restart
3. 查看当前Git版本
1 | git --verison |
4. 安装Node.js
1 | sudo apt-get install nodejs -y |
5. 安装Hexo
1 | npm install -g cli |
5.1 配置Hexo
1 | # 进入想要存放博客的文件夹 |
报错:npm WARN optional Skipping failed optional dependency /chokidar/fsevents:
npm WARN notsup Not compatible with your operating system or architecture: fsevents@1.1.3
原因:fsevent是mac osx系统的,你是在win或者Linux下使用了 所以会有警告,忽略即可
5.2 安装主题
1 | # 进入主题文件夹themes |
5.3 启动Hexo
1 | hexo s |